
How to Fix Leaky Brake Line Fittings
If your brake line is leaking where the flare joins the fitting it is important to address the issue immediately and with a legitimate solution.
I was fed up with the unreliable, “band-aid” fixes out there when I was repairing a leaky brake line on my Packard Coupe. As a result, I created the Surseat Flare Lapping Tool and Fitting Fixer.
Why Brake Lines Leak at the Flare
Brake lines will leak at the flare when there is a poor connection with the seat of the fitting. This type of leak is commonly known as a weep. It is the result of a tiny imperfection in the flare that occurs while flaring the tube. No matter what flaring tool I used, I never got a clean, concentric finish that enabled the flare to seat with the fitting. Furthermore, it didn’t matter if I was using steel lines with a 45° double flare or stainless steel lines with a 37° single flare.
Why Brake Lines Leak at the Fitting
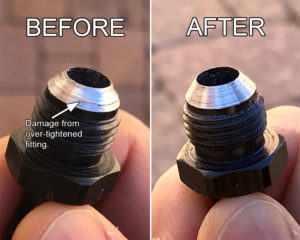
Most of the time the cause of a leaky flare fitting connection has to do with the flare, but there could be a problem with the fitting. Fittings can get damaged by over tightening them with an imperfect flare, by dropping them, or from some other accident where you end up with a ding. A damaged fitting can be very problematic, especially when it’s built into a radiator or welded into a tank.
How to Seal Flare Fitting Connections
Lapping is a tried and true practice that goes back 100 years. Even with the best equipment, mechanics always lapped engine valves to ensure they wouldn’t leak. It occurred to me that lapping the flare on the brake line could get the tube to seat with the fitting. I decided to apply this principle to flared tubing, and it fixed the leak I was getting in my Packard.
Here’s how to lap flared tubing:
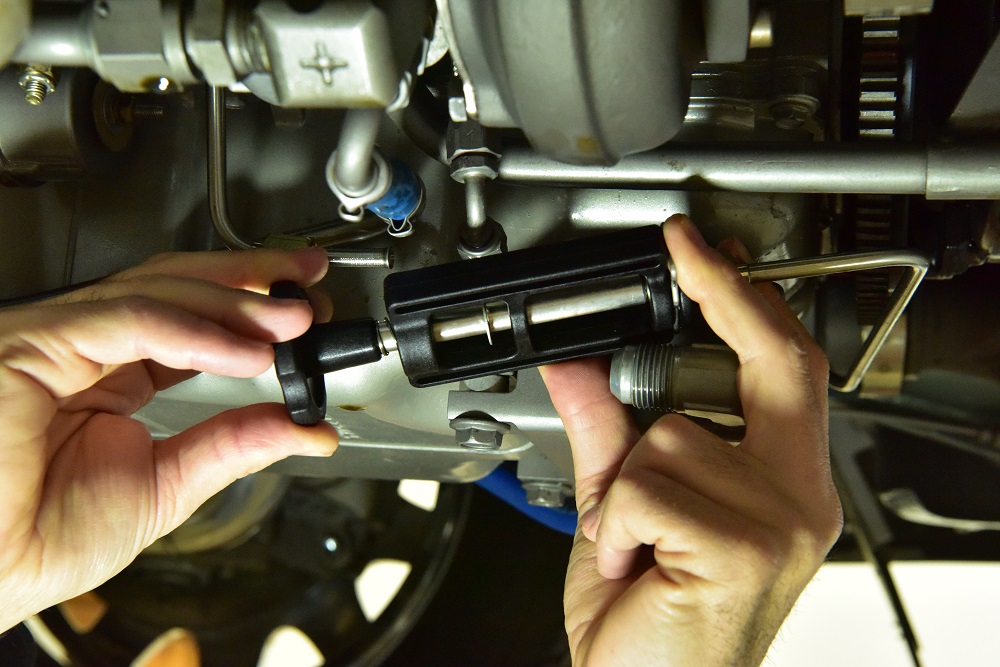
1. Unscrew the brake line from the fitting.
2. Clamp the appropriate-sized collet around the line.
3. Connect it to the Surseat lapping tool.
4. Spray some lubricant to the lapping head before using it.
5. Rotate the lapping head back and forth about 6-10 times.
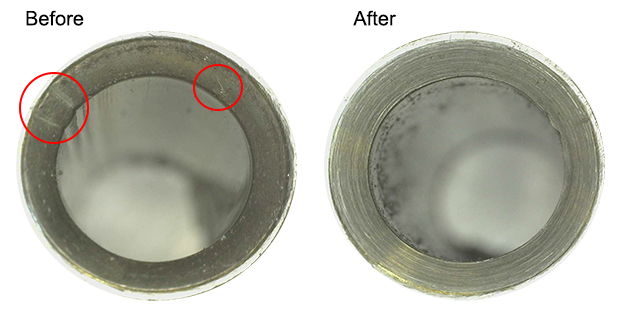
6. Clean and inspect the flare. There should be a smooth, concentric finish. If not, repeat step #5.
7. Remove the brake line from the Surseat and reconnect it to the fitting.
8. Bleed the brakes and check the seal.
► Click here to shop Surseat lapping tools.
How to resurface fittings:
1. Screw the fitting into the Fitting Fixer guide.
2. Connect the lapping head to a drill or tap handle.
3. Spray some lubricant into the cavity of the lapping head.
4. Insert the lapping head into the guide and over the fitting.
5. Spin the lapping head on the fitting, releasing every 2-3 seconds to prevent clogging.
6. After about 5-6 passes, remove the fitting and inspect the surface. Repeat step # 5 if necessary.
► Click here to shop Fitting Fixer tools.
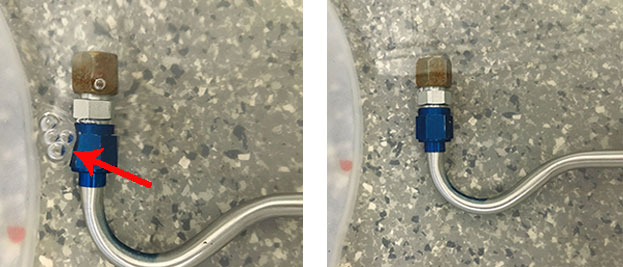
How to Check for a Leak Where the Flare Joins the Fitting
If you have your brake or fuel line out of your vehicle, there’s an easy way to check to see if there’s a leak at the fitting.
First, plug the end of the tube that you are checking by screwing in a cap flared tube nut or anything similar that will seal off that end of the tube. You can also purchase Earl’s Performance Pressure Test Kits if you don’t have anything that will work.
Next, submerge the line in water and run air through the opposite end of the tube. If bubbles appear at the fitting, the seal is no good. Repeat the lapping process until you get no bubbles.
Real-World Examples
Here are some testimonials from people that have used the Surseat lapping tool to seal their flare fitting connections:
“I have been double flaring brake lines for street rods for 30 years with great success. My latest project, a 32 Ford Roadster, had 6 fittings that I could not get to seal. After continuously trying to tighten the fittings, hoping that the joint would seal, I couldn’t eliminate the weep in the brake system. I remember seeing this tool at the Street Rods Nationals and decided to order one to see if it would solve my problems. I disassembled the entire brake system and lapped every flare with the Koul Tool P45. Then I reassembled the brake system and didn’t have a single issue. From now on, I will lap every fitting I make just to make sure I get a proper seal on my brake fittings. The tool is easy to use and certainly performs.”
– Bill Kantos
“I use the Surseat flare lapping tool when building the hard line brake system for my 410 sprint cars. My flaring tool is good, but even when using the best of tools, sometimes the flare seat just doesn’t seal perfectly without excessive tightening of brake connection. Your Surseat lapping tool results in a perfect seal without excessive tightening. The tool provides a lapping action on the formed flare. You can see the lapping marks around the flare which indicates that you will have a perfect seal upon assembly. Use of the tool takes only minutes and prevents having to replace lines due to leaks.”
– John Shewbrooks Racing
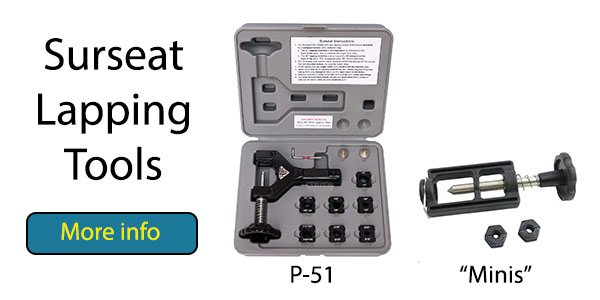
More About the Surseat
The Surseat flare lapping tools have a precision, diamond-dust coated lapping head that will hone tubing flares to enable them to seat with the fitting. They come in three different models:
- The Surseat P-51 has interchangeable 37° and 45° lapping cones and will do 3/16″ to 1/2″ inch tubing. This is your “complete kit” for brake and fuel lines.
- Surseat “Minis” are designed specifically for brake lines. The smaller size and rectangular shape of the P-45 and P-37 make it easier to work in tight spaces inside the car. Each model has a single 45° or 37° lapping head and collets to secure 3/16″ or 1/4″ brake lines.

Hi I am a 62 year old hot rodder. I decided to go with ss brake and clutch lines on my most recent car project. When I tested my newly plumbed brake system I had uncontrollable leaks. I used a soapy water mix and air as the medium for pressuring the system..so I had a bubbling mess. I bought quality tooling to accomplish these an-3 flares. I made each and every flares correctly and still leaks. I went to hydraulic shops and showed them basically chained my tail for 2 days. I heard of this company KOUL tools from a customer service rep from Speedway auto. He told it might be worth the call. I made the call I first spoke to a very nice young man Mike, he put me in touch with Dick. Dick happens to be the brains behind KOUL tools. I was very apprehensive to purchase another tool as I was already in this project for a pretty penny,know another tool, REALLY! I thought. Dick was very convincing so I bought the P-37 tool. This tool saved me from having to completely remake every brake line on this build. The tool works as advertised and anyone who is building or planning on building a complete brake system or hydraulic system of sorts needs this tool.
I just today realized that when I had installed the lines originally I had messed up the seat on some of the fittings. Right back to KOUL tools I went for the tool that repairs the 37’ degree flare on the fittings. Now I will tell you these tools are very well engineered and not complicated to set up and or use.
So if you have exhausted all possibilities and you think the only thing to do is start over just call KOUL tools and speak with Dick and you may just find out that there may be a KOUL Tool for you out there
These are flared fittings. How do they work on diesel fuel pump fuel lines which are flat?
Ive done hundreds of lines and fittings during my tenure as an upstanding wrench. I have never ever(lol) had as many issues with leaking flares. I am looking at this as a possible solution. But for a REAL real world example as i am not tearing half a finished car apart, with non leaking joints, to lap every single one. Na! I just wanna fix the 2 that are. The above flare lapper would be perfect for the line. My bigger issue is th fitting at the end of the flex hose. The inner inverted flare has a ring or witness mark from the line. Fixing only the fem flare will most likely still result it weeping fluid. Would the fitting fixer work at all? I think im a victim of too much stainless. SS hardline + SS hose end = bad ju ju
Hello Brian,
I totally agree with you about not fixing a non-leaking joint. There is an old saying, “don’t go into the cave looking for the bear”.
If you do have a leaking joint, it is usually caused by a poor sealing surface on the flare. With welded tube, the seam is usually the cause of a leak. By lapping the flare with our diamond dust lapping head, you will be smoothing out the seat for a perfect fit to the fitting. This is why valves are still lapped into their seat after a valve grinding job – so they don’t leak. Also, a poor flare can damage a perfectly good fitting surface.
If you do have a leaking joint, be sure to check the fitting as well as the flare. The flare can damage the fitting. That is why I came out with Fitting Fixer.
As far as repairing a female fitting, we don’t have a tool for that right now. However, I have cut down one of our lapping heads to repair the sealing surface of that fitting. To do that, you would need access to a small lathe.
Feel free to call us anytime.
Dick